Last updated: August 10, 2026
Learning how to insulate a dog house is one of those projects where an afternoon of work changes every cold night that follows. A basic shell keeps rain off but sits barely warmer than the outside air; the same shell with sealed gaps, foam-lined walls, a raised floor, deep straw, and a door flap holds a pocket of your dog’s body heat all night. None of it requires carpentry skills, and most of it costs less than replacing the house would.
This guide walks through the full job step by step, in the order that gets the most warmth per hour of effort. It also covers the materials that work outdoors, the ones that fail, and the safety rules, chew-proofing and ventilation above all, that keep a cozy house from becoming a hazard.
Quick Answer
How do you insulate a dog house?
- Raise the house off the ground, seal drafts, line walls and ceiling with rigid foam board, and cover every piece of foam with a solid panel your dog cannot chew.
- Finish with deep straw bedding and a flexible door flap, and keep one small vent high in the house open for moisture.
- Skip blankets, loose fiberglass, and any exposed foam: they hold damp, irritate, or get eaten.
The Step-by-Step Insulation Plan
Work through these in order; the early steps are the cheapest and do the most. Save this list for the fall weekend you set the house up.
- Check the fit first. Insulation traps your dog’s body heat, and that only works in a snug interior: room to walk in, turn around, and lie stretched out, with modest headroom. If the house is far bigger than that, insulating panels that shrink the interior are a feature, not a loss.
- Raise the house. Set it on concrete blocks, pavers, or a wooden pallet so air moves underneath. Ground contact drains heat into the soil and wicks moisture into the floor, and no wall insulation compensates for a cold, damp base.
- Seal gaps and cracks. Work around the house with outdoor-rated, pet-safe sealant on joints, seams, and screw holes. Drafts move more heat than thin walls do, so this quiet step outperforms its looks.
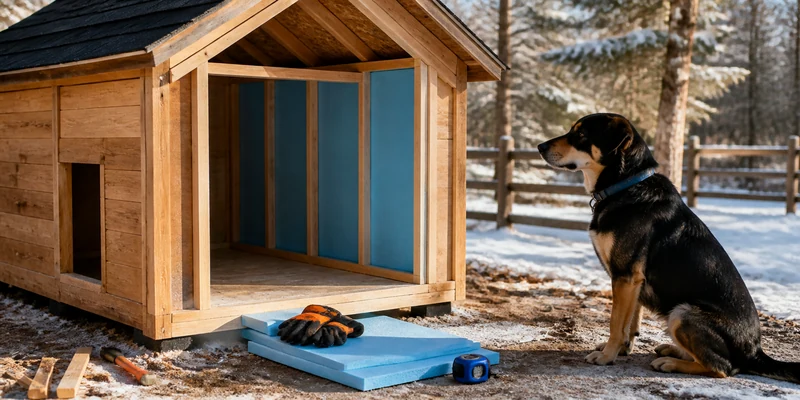
- Line the walls with rigid foam board. Cut extruded polystyrene or similar foam board to fit each interior wall and the ceiling. It cuts with a utility knife, resists moisture, and is the standard DIY choice for this job.
- Cover every inch of foam. Screw thin plywood or rigid plastic panels over the foam so none of it is reachable. This step is mandatory: chewed and swallowed foam is a real hazard, and most dogs will investigate a soft wall eventually.
- Insulate the floor. A foam layer under a plywood cover, or at minimum a rigid liner over the existing floor, stops the last big heat leak. In wooden houses with framing, fit the foam between the joists.
- Add deep straw bedding. Straw sheds moisture and keeps its insulating loft in freezing weather. Pile it deep enough that your dog nests into it, and refresh it whenever it flattens or smells musty.
- Hang a door flap. A flexible flap over the doorway stops the single biggest heat leak in the house. Buy the manufacturer’s flap if one exists for your model, or make one from heavy vinyl.
- Keep a vent open. Leave one small opening high in the house, or keep the built-in roof vent clear. Breath moisture has to escape, or it condenses into the bedding and makes everything colder.
- Recheck monthly through winter. Straw flattens, sealant cracks, flaps tear, and covers work loose. A five-minute monthly inspection keeps the whole system honest.
Materials: What Works and What Fails
The material question decides both warmth and safety, so it deserves its own look before you buy anything.
| Material | Verdict | Why |
|---|---|---|
| Rigid foam board | The standard | Insulates well, resists moisture, easy to cut; must be fully covered |
| Reflective foil insulation | Good supplement | Thin, useful behind panels and under roofs; also needs covering |
| Straw (bedding) | Essential | Sheds damp, keeps loft, cheap to refresh through the season |
| Plywood or plastic liner | Required cover | Keeps every insulation layer out of reach of teeth |
| Blankets and towels | Fails outdoors | Absorb moisture and freeze stiff, making the house colder |
| Hay | Worse than straw | Holds damp and molds faster; straw is the outdoor bedding |
| Loose fiberglass | Avoid | Irritates skin and lungs and is risky anywhere a dog can reach |
| Spray foam, exposed | Only if enclosed | Fine sealed behind panels, hazardous anywhere chewable |
The pattern is simple: rigid, moisture-resistant, and covered wins; soft, absorbent, or reachable fails. If your house turns out to be too thin-walled or too far gone to be worth lining, see what built-in insulated construction looks like in a purpose-made insulated dog house before spending on materials.
Placement Finishes the Job
An insulated house in the wrong spot gives half its gains back. Face the doorway away from the prevailing wind, which for much of the US means pointing it east or south, and use whatever windbreak the yard offers: a wall, a fence line, a hedge, the sheltered side of a shed. Avoid low ground where meltwater collects, and check after the first storm that runoff drains away from the entrance rather than toward it.
Think about sun as well. In winter, a spot that catches morning sun warms the house for free; in summer, the same house needs shade, especially if it is plastic. If you cannot have both, prioritize the winter position and provide separate shade in the warm months.
When Insulation Is Not Enough
A dry, snug, wind-sheltered insulated house serves most dogs in most winters. The honest exceptions: climates that hold below freezing for weeks, and dogs who are short-coated, lean, very young, senior, or unwell. For the climate problem, the safe upgrade is an outdoor-rated heated pad with a thermostat, a chew-resistant cord, and an independent safety listing; see what to look for in a heated dog house setup before buying anything electric. Heat lamps and human space heaters stay out of dog houses entirely, in every scenario.
For the dog-specific question, watch behavior: shivering, reluctance to settle outside, or constant heat-seeking mean the setup is not enough for that dog, whatever the thermometer says. In severe cold, every dog belongs indoors, and if you are unsure where your own dog’s limit sits, that is a question for your veterinarian, not for more insulation.
Common Mistakes to Avoid
- Leaving foam exposed. The most serious error in this project. Every piece of insulation gets a solid cover, no exceptions.
- Sealing the house airtight. Warm but damp is a losing trade. One small high vent stays open all winter.
- Insulating a house on bare ground. The soil wins that exchange every night. Elevation comes before wall work.
- Using blankets because they feel cozier. They feel cozy indoors. Outdoors they absorb damp and freeze; straw does the actual job.
- Insulating an oversized house and stopping there. If the interior is far too big, add a partition or interior box to shrink the sleeping chamber; otherwise body heat has too much space to fill.
- One-and-done thinking. Insulation is a system that degrades. The monthly five-minute check is part of the project.
Ready for the Bigger Picture?
Insulation is one layer of the winter setup. The full checklist, house choice, bedding, placement, and the limits of outdoor sheltering, lives in our guide to the outside dog house for winter. If the project has convinced you the current house is the problem, the dog house buying guide compares shapes and materials from scratch. And for adding safe electric warmth on top of your insulation work, start with the dog house heater guide.
Frequently Asked Questions
What is the cheapest way to insulate a dog house? Elevation, sealed gaps, deep straw, and a door flap: together they cost very little and deliver most of the benefit. Foam board lining is the next step up and is still an inexpensive afternoon project.
Is straw or hay better for a dog house? Straw. It is hollow, sheds moisture, and keeps its insulating loft, while hay holds damp and molds faster. Refresh straw through the season whenever it flattens.
Can I use spray foam in a dog house? Only where it ends up completely sealed behind panels. Any foam a dog can reach with teeth is a hazard, and spray foam is no exception.
Does a dog house need ventilation after insulating? Yes, one small vent high in the house. Breath moisture must escape, or it condenses into damp bedding and a colder dog. Airtight is the wrong goal.
How warm does an insulated dog house get? There is no standard number: it depends on the dog’s size, the fit of the interior, wind, and moisture. A snug, dry, well-bedded insulated house sits noticeably above the outside temperature, but it remains unheated shelter, not a heated kennel.
Should the floor be insulated too? Yes, the floor is a major heat leak once the walls are done. Foam under a plywood cover, or fitted between the joists of a wooden house, plus elevation off the ground, closes it.
The Bottom Line
Insulating a dog house is a system, not a single material: raise it, seal it, line walls and floor with covered foam board, bed it deep with straw, hang a flap, and leave one high vent open. Every layer of foam stays behind a chew-proof cover, and the whole setup gets a quick check each month. Done in order, it is an afternoon that pays back all winter.